
Introduction
I recently took on a freelance project that involved having to upload media files. This is a trivially simple task to accomplish if you're using something like Laravel, using out-of-the-box support for S3 storage.
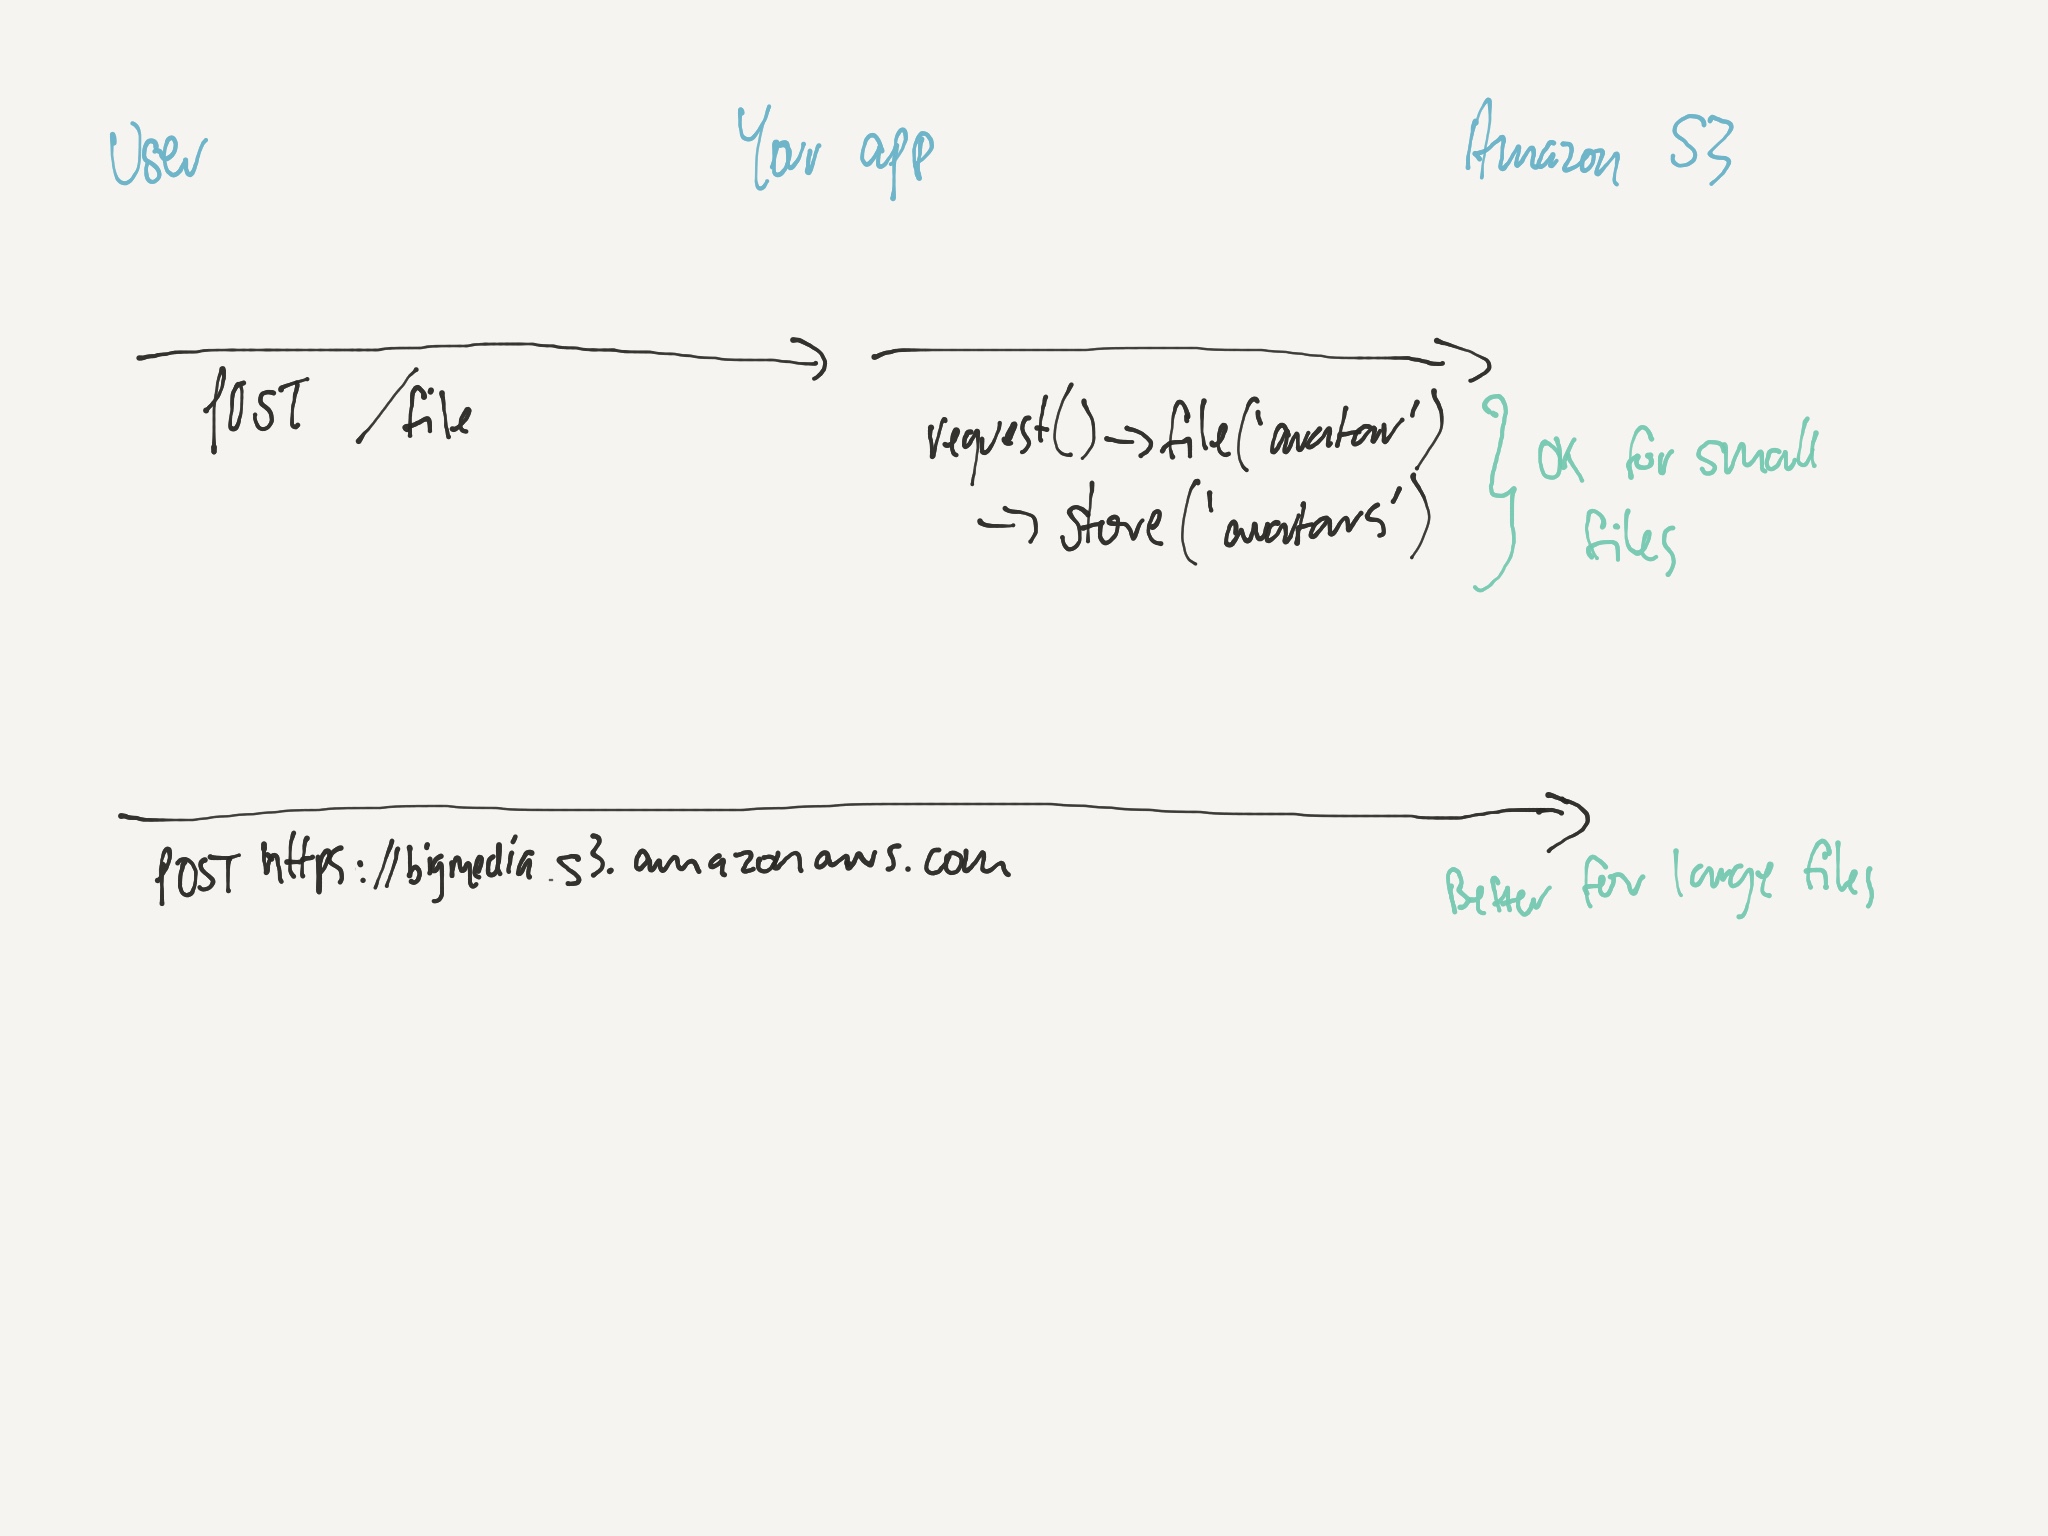
In this particular case, however, I was dealing with files potentially multiple gigabytes in size. Although a simpler to implement, I didn't want to have to have users of the site upload the file to my application - and thus server - before having my server re-upload the file to S3.
For smaller files - things like profile images, PDF files, etc. - uploading via your server isn't a big deal. Generally, your server will have a fast enough upload connection that your users won't notice the latency in the two-step process, and even if they did, you could queue the process easily enough.
When it comes to uploading larger files - hundreds of megabytes, or even gigabytes in size - a direct upload makes more sense. The process is shorter for your app’s users and also means you're not using your server’s outbound bandwidth to double-handle the files.
How it works
If you want security for your files, uploading to S3 is not merely a process of sending a POST request to some Amazon endpoint. Unless you explicitly want publicly accessible files, you need to sign your upload requests.
In a similar way to how you generate signed, expiring URLs to access private files from a bucket via HTTP, you must sign your file upload request.
There are a couple of approaches to this, and whilst less straightforward than using Laravel's built-in tools, it's not too difficult once you know how.
Update 2017-10-18: It was brought to my attention that the signing method used in this post uses AWS Signature Version 2, which isn't available with all regions. I'll update the post shortly with AWS Signature Version 4, which should provide better future compatibility.
S3 permissions
First of all, you'll need to create a user to upload with if you haven't already.
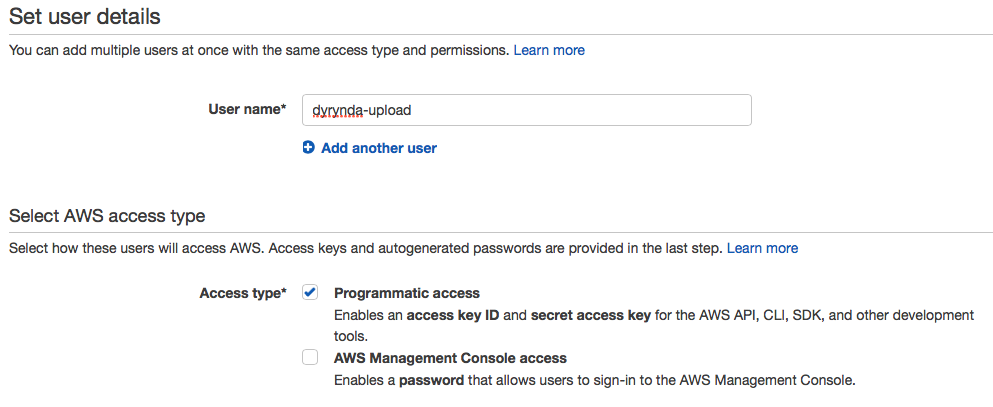
Next, create an IAM policy and attach it to your newly created user so they have write access to your bucket (replace dyrynda-upload with your bucket’s name).
{
    "Version": "2012-10-17",
    "Statement": [
        {
            "Effect": "Allow",
            "Action": [
                "s3:ListBucket",
                "s3:ListAllMyBuckets",
                "s3:GetBucketLocation"
            ],
            "Resource": [
                "arn:aws:s3:::dyrynda-upload"
            ]
        },
        {
            "Effect": "Allow",
            "Action": [
                "s3:PutObject",
                "s3:GetObject",
                "s3:DeleteObject"
            ],
            "Resource": [
                "arn:aws:s3:::dyrynda-upload/*"
            ]
        }
    ]
}
Basic upload form
In its most basic implementation, what you'll create is something that looks like the following.
<form method="post" action="https://dyrynda-upload.s3.amazonaws.com" enctype="multipart/form-data">
    <input type="hidden" name="key" value="${filename}">
    <input type="file" name="file">
    <button type="submit">Upload</button>
</form>
This simple form will take the user to S3 for the upload itself. The ${filename} value for the hidden key input simply tells S3 to save the file with the filename of the uploaded file at the root of the bucket.
By default, Amazon will return a 204 Created response with no further information. This isn't particularly useful to visitors of your site, as it's not obvious anything has happened, even though the file will have successfully uploaded. We can specify a hidden input with name success_action_redirect, which Amazon will redirect the user to upon successful upload.
As our bucket is private, however, we must also sign the upload request, and immediately our form gets a little more complicated:
<form method="post" action="https://{{ config('filesystems.disks.s3.bucket') }}.s3.amazonaws.com" enctype="multipart/form-data">
    <input type="hidden" name="AWSAccessKeyId" value="{{ config('filesystems.disks.s3.key') }}">
    <input type="hidden" name="acl" value="private">
    <input type="hidden" name="key" value="${filename}">
    <input type="hidden" name="policy" value="{{ $policy }}">
    <input type="hidden" name="success_action_redirect" value="{{ url('/s3-upload') }}">
    <input type="hidden" name="signature" value="{{ $signature }}">
    <input type="file" name="file">
    <button type="submit">Upload</button>
</form>
We’ve added the following fields to our form:
AWSAcessKeyId- the public key for our user, so there is no fear adding it the rendered HTML output.acl- the permissions applied to the object when it is created in our bucket. If you're going to be interfacing with these files with a user other than the one created to upload it, you may prefer to usebucket-owner-full-controlinstead.policy- a Base64-encoded JSON object describing what is permitted in the request.success_access_redirect- where the user should be directed upon successful upload.signature- the calculated (SHA1) signature of the form request.
As you add more input fields to your form, it is important to remember that the file field must be the very last field specified.
Implementation
For simplicity's sake, I'm using Laravel and have created two closure routes in my `routes/web.php’:
GET /- has the file upload form we created above, andGET /s3-upload- handles the successful response from Amazon, dumping the request parameters in its response.
// routes/web.php
Route::get('/', function () {
    return view('welcome', [
        'policy' => $policy = createPolicy(),
        'signature' => signPolicy($policy),
    ]);
});

Route::get('/s3-upload', function () {
    return request()->all();
});
Signing the request
To sign the request, you first create the policy document describing the forthcoming request, and subsequently create a a SHA1 signature of the policy using your S3 secret key.
Creating the policy document
The policy document is a Base64-encoded JSON object, which describes what is permitted in the request. Requests without a policy document are considered anonymous and will succeed only on publicly writable buckets - avoid this, unless you want to foot the internet's bill for uploading to your bucket!
// routes/web.php
function createPolicy() {
    return base64_encode(json_encode([
        'expiration' => now()->addHour()->format('Y-m-d\TG:i:s\Z'),
        'conditions' => [
            ['bucket' => config('filesystems.disks.s3.bucket')],
            ['acl' => 'private'],
            ['starts-with', '$key', ''],
            ['eq', '$success_action_redirect', url('/s3-upload')],
        ],
    ]));
}
This function returns the encoded string that represents the policy document. The expiration key takes the current time and adds one hour to it, returning it in ISO8601 format. The format is specified manually because PHP’s built-in format is incompatible with the standard.
This allows your users to upload using the signed form request within one hour of being generated i.e. page load. If you're dealing with multiple files, or large files, it may be worth increasing this time as you see fit.
The conditions key is an array used to further describe what is allowed to be sent in the request. In our instance, we specify:
- the
bucketthat is allowed to be posted to, matching the form action - the
$keystarts with''i.e. any value is allowed - the
aclisprivate, and - ensuring that the user is redirected back to our
/s3-uploadendpoint, by making sure the$success_action_redirectis what we expect it to be.
Sign the policy document
Signing the request is done using your S3 user credentials’ secret key, using the Base64-encoded raw output of the hashed value of your policy document. Don’t miss that last Boolean true; it’s important!
// routes/web.php
function signPolicy($policy)
{
    return with($policy, function ($policy) {
        return base64_encode(hash_hmac(
            'sha1',
            $policy,
            config('filesystems.disks.s3.secret'),
            true
        ));
    });
}
With this in place, you can now select a file and upload it to your S3 bucket directly, without the file ever touching your server. Once the upload is complete, Amazon will direct the user back to the URL specified in the success_action_redirect input, appending the bucket, key, and etag associated with the new object.
That’s all there is to it!
You can take this process one step further and handle the returned object data in your app by creating a database record and redirecting the user to a success page.
Conclusion
You now have the ability to let your users upload files directly to an Amazon S3 bucket without the file ever touching your server. I explained how to set up a form with the necessary fields to upload a file, how to generate a policy document describing the request, and signing the request allowing the request to be sent to S3 directly.
For many cases, you can use the S3 SDK directly or Laravel's storage component to handle this seamlessly on the server-side, but for large files where you want to avoid a user uploading their file to your server, then having your application upload the file to S3, client-side file upload is the way to go.
In Part Two of this series, we'll look at taking what we have started with here and provide a more seamless user experience by leveraging DropzoneJS to handle the upload and callback with the user never having to leave your site.
References